
If you're on WordPress and you already have Gravity Forms, you can take payments right on your own site without adding an e-commerce platform. You just need to use the Stripe Add-on and follow the steps below:
Install the Gravity Forms Stripe Add-On
Connect your Stripe account to Gravity Forms under Forms, Settings, Stripe,
Create a webhook in Stripe (This is how Stripe tells your website what happened to a payment)
Paste the webhook signing secret back into WordPress (This tells the website it's really from Stripe)
Create a feed on the form itself. (How the payment information reaches Stripe.)
Subscribe to our YouTube Channel
This post contains affiliate links. I mention Gravity Forms* in this post with my affiliate link. Using it helps me provide free resources like this. This guide walks through the Gravity Forms Stripe add-on end to end. If you purchase through my link, Gravity Forms may pay me a small commission at no extra cost to you. I only recommend tools I use in my own business and with clients.
If you're a coach or service provider, you need a way to sell your coaching packages, possibly a masterclass, or a low-ticket offer. The challenge is that shopping cart platforms like Shopify, Thrivecart, and WooCommerce are often overkill and expensive.
You could use a Stripe link to a Stripe-hosted checkout page, but you're sending people away from your website, and you can't control the experience.
In today's post, I'll show you how to do it using Gravity Forms* (a WordPress form plugin) and a Stripe add-on. It's a DIY project that most people can handle if they have a good tutorial (this is it), even if you have a limited technical background.
One of my clients (who is pretty darned good at tech) asked me last week, "How do I connect my Gravity Forms to Stripe?" We had already installed Gravity Forms when we built her site. She got stuck after installing the Stripe Add-On when it came time to connect Gravity Forms, adding the webhook and signing secret, and setting up the Stripe feed.
I totally understand her dilemma. Dancing through new tech platforms is never easy, and the documentation on Stripe is written for developers, not the typical WordPress user, like the coaches I work with.
Here's what makes it feel hard: when connecting Stripe to your Gravity Forms, you have to flip-flop between two dashboards, copy and paste from one to the other… and there aren’t pictures to show you what to look for or where to click. If you miss something, you're out of luck. The form won't work, your payments won't process, and you waste a day (or more) trying to troubleshoot it.
The good news is it's a ten-minute setup.
I recorded a video to show my client how to do it. Then I decided I'd create a tutorial for you too! If you'd rather watch, the video covers the same setup start to finish.
What you need before you start
You probably already have these things in place, but it's always good to double-check.
An SSL certificate on your site, so your address starts with https. Stripe will not connect to a site without one.
An up-to-date Gravity Forms* plugin and active license installed on your site. Tip: Double-check to make sure your license includes the Stripe Add-Ons. It’s included on the Pro and Elite (and Nonprofit) tiers.
WordPress should also be up to date.
Owner, developer, or administrator access to the Stripe account. Team members with limited permissions won't be able to do it.
Two-factor authentication turned on in Stripe.
I recommend you open two tabs in your browser: one logged into your Stripe account and your WordPress dashboard in the other. You'll need to toggle between them during the setup.
Step 1: Install the Stripe Add-On
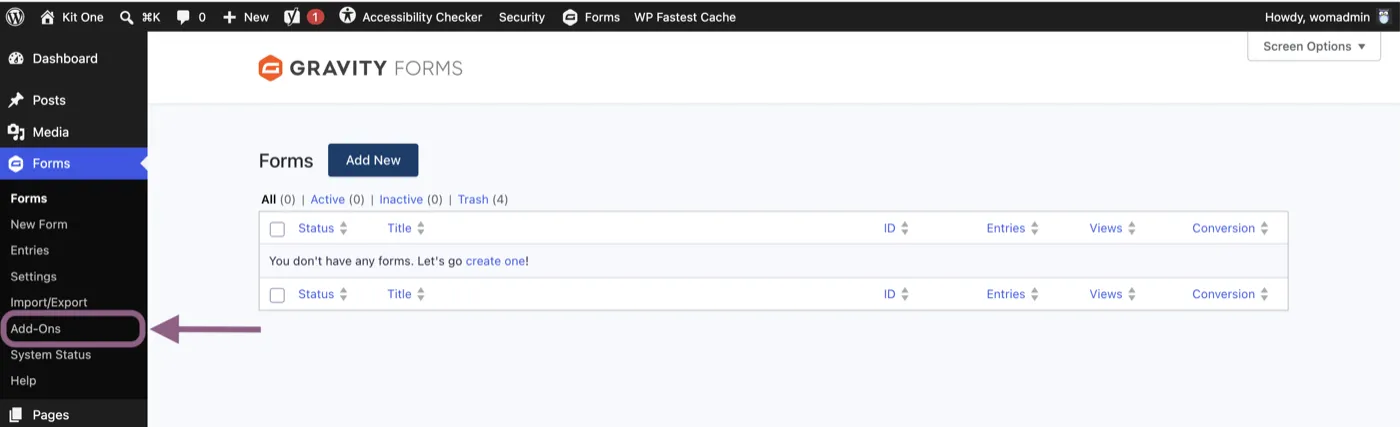
In WordPress, go to Forms and then Add-Ons. Stripe usually sits right at the top.
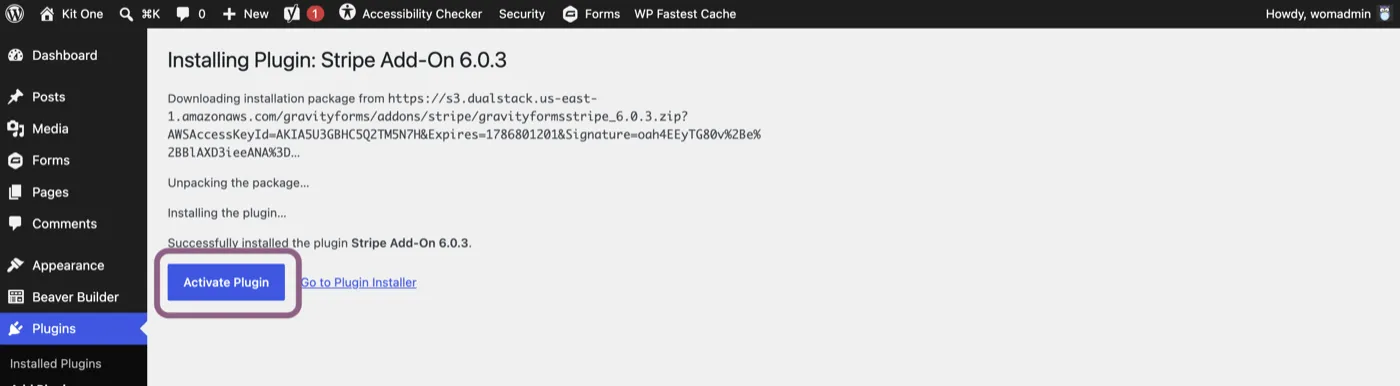
Click Install, then Activate Plugin. You'll see the Gravity Forms Stripe Add-On listed once it's done.
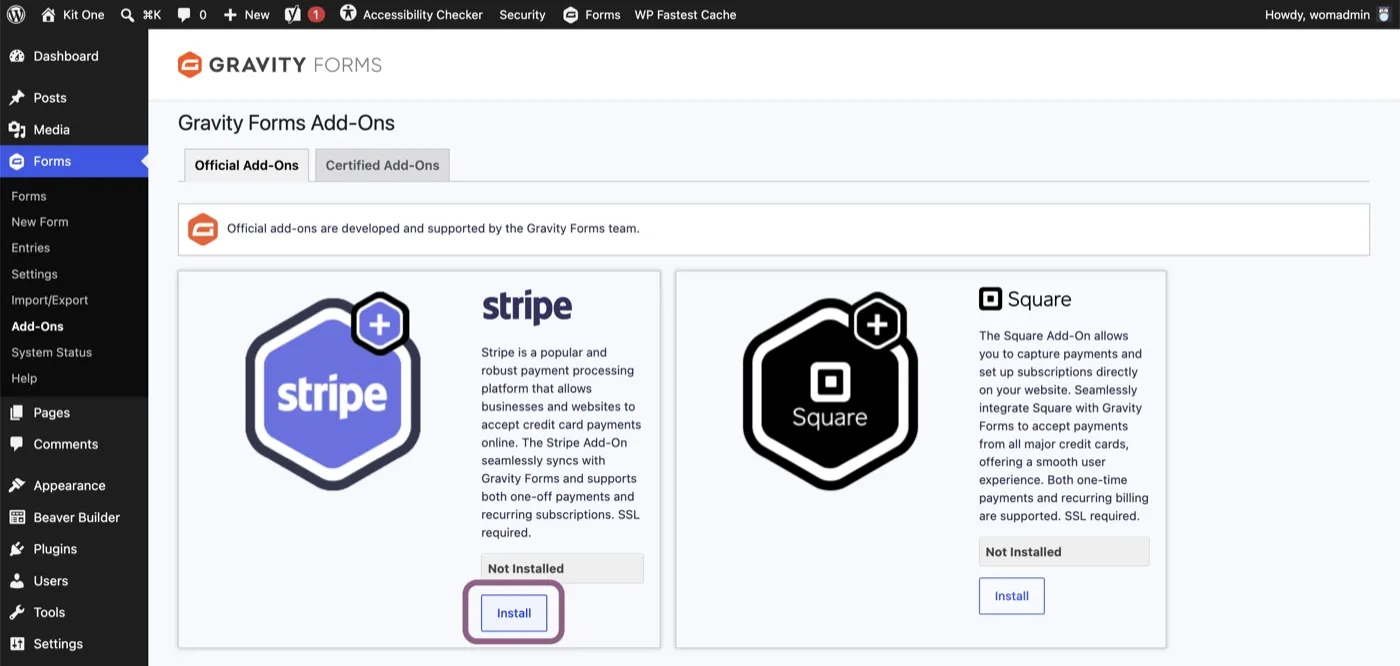
If Stripe isn't in that list at all, your Gravity Forms license may not cover it. It's worth checking before you go hunting for a settings page that isn't there.
Step 2: Build a form that can take payment
Head back up to Forms in the left-hand column, and click Add New. Gravity Forms has a Stripe Checkout Form template; find it and click Use Template. It will save you from having to build the payment fields from scratch.
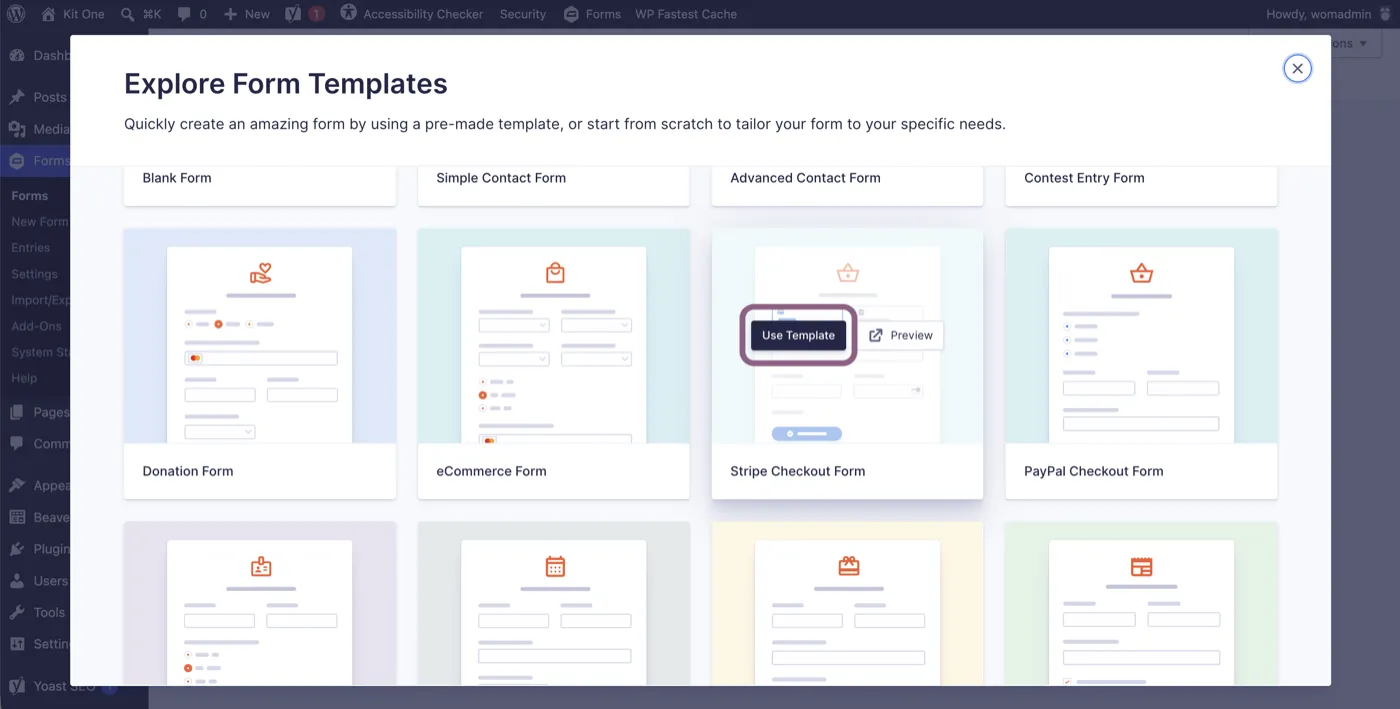
Give it a name you'll recognize later, then click Use Template.
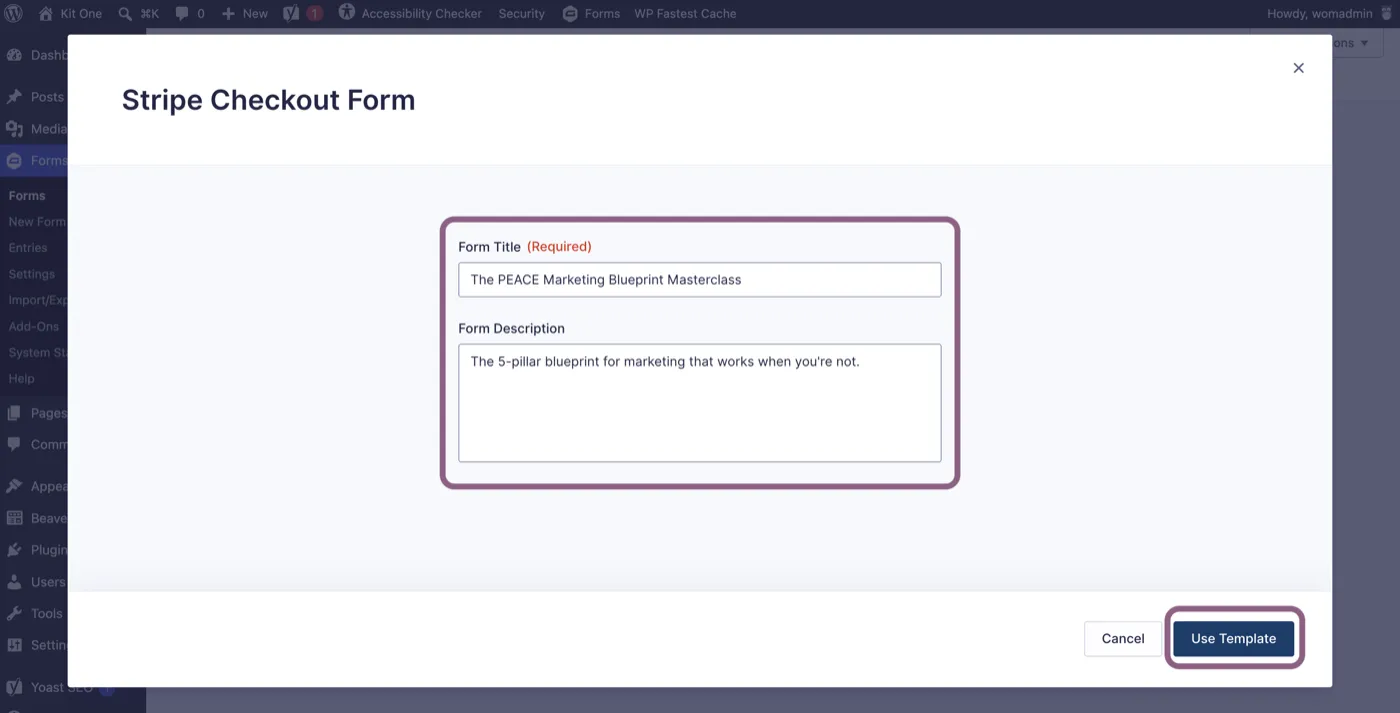
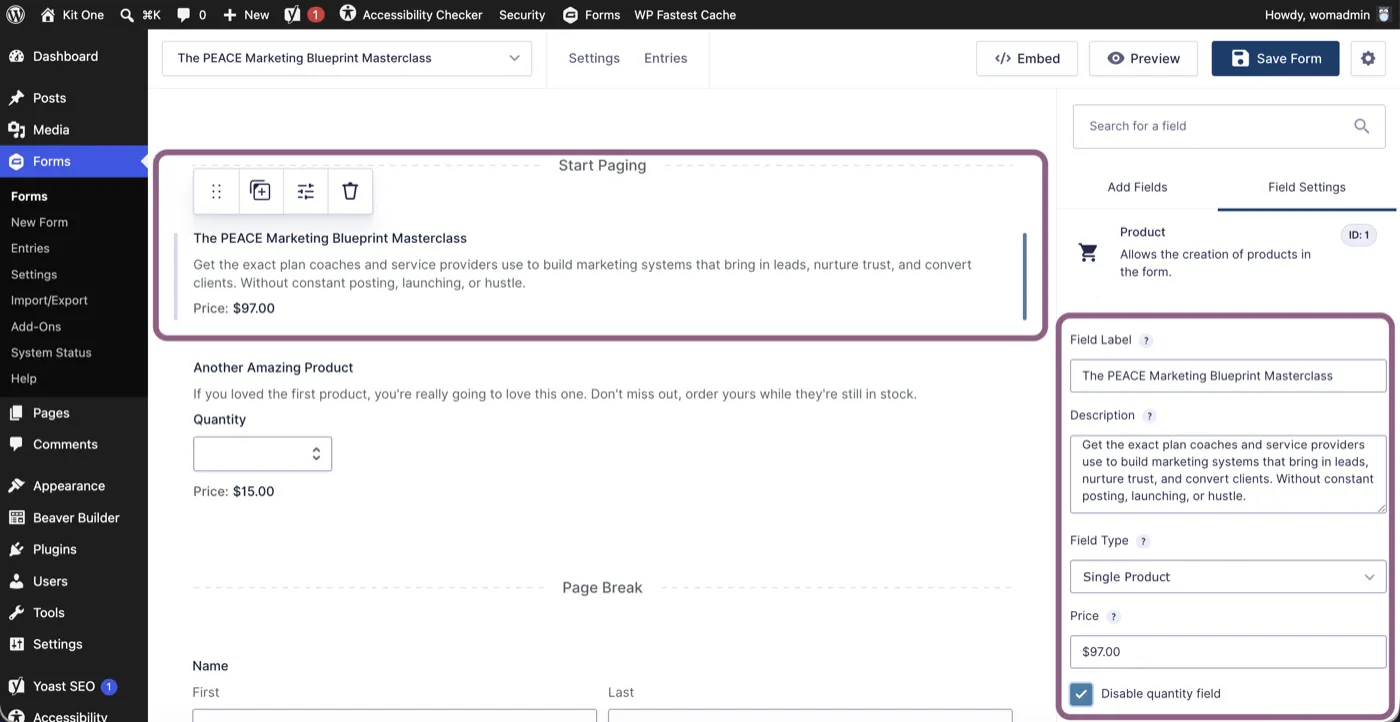
The template comes with sample products already on it, something like "my super awesome pro product" and "another amazing product." Those are placeholders. Click on any of them and then change the label, the description, and the price in the right-hand column. Delete anything you don't need from the form.
Gravity Forms is an awesome plugin, and you can build quizzes and all sorts with it. If you don't have it, it's a smart investment. I started installing Gravity Forms* exclusively on client sites around 2017, and to this day, almost a decade later, it's still my number one choice.
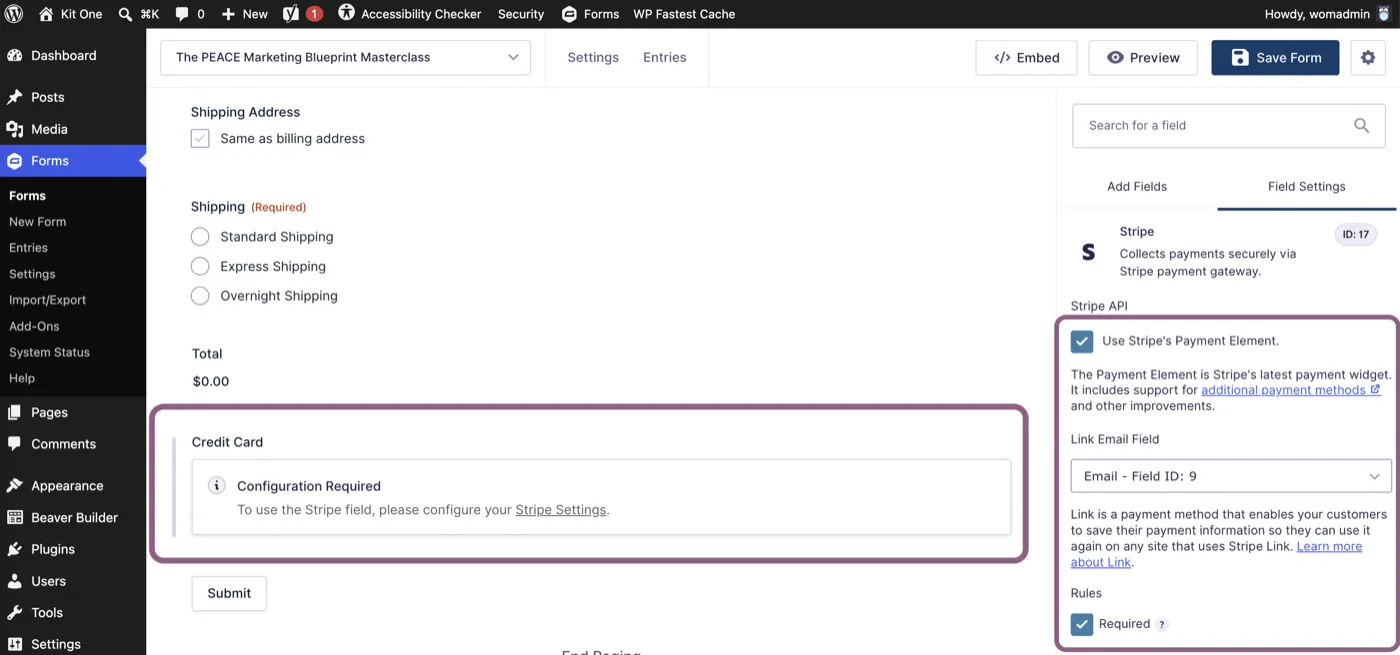
Once your product is set up, scroll down to the Credit Card field and click on it.
We are going to set up three things here in the right-hand column.
Tick Use Stripe's Payment Element.
Connect the Link Email Field to the email field on your form. That's what Stripe uses to save someone's payment information for next time.
Mark the field Required, so nobody can submit without paying.
Things to know: You can only have one Stripe field per form. If you are building a multi-page form, the checkout field must be on the last page.
Then click Save Form.
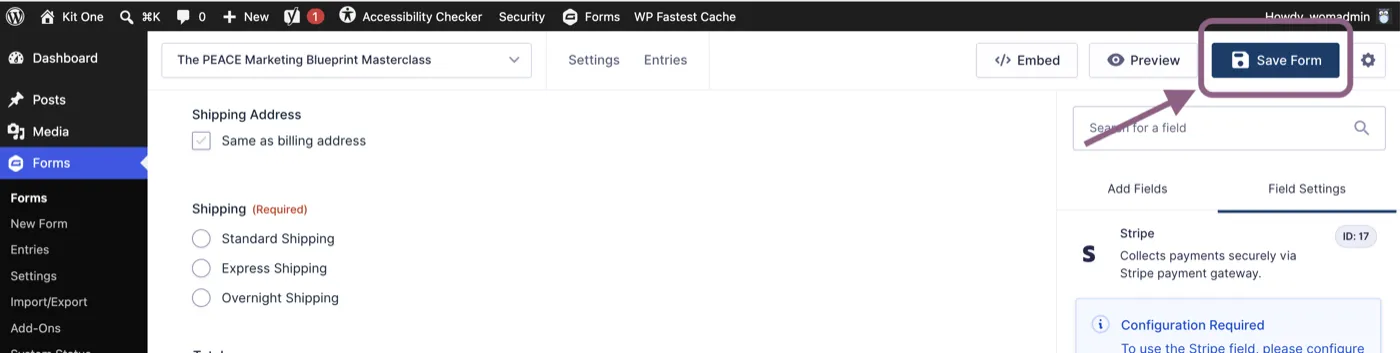
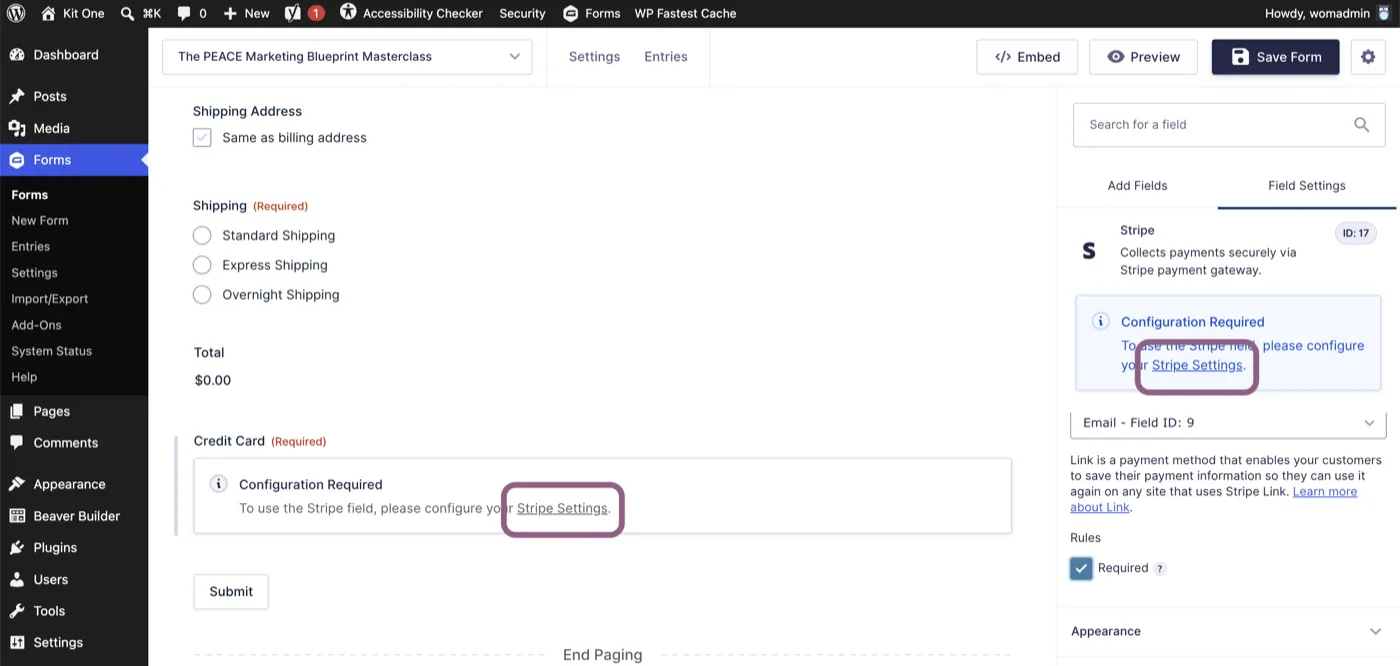
Once it saves, you'll see a Configuration Required notice with a link to your Stripe settings. There's one on the field and one down in the form itself, and they go to the same place.
Click on Stripe Settings to go to the next step.
Step 3: Connect your Stripe account
When you click on the Settings Stripe link in the previous step, a new tab will open, and you will be taken to a page that looks like the one below (Forms, Settings, Stripe) in a new tab.
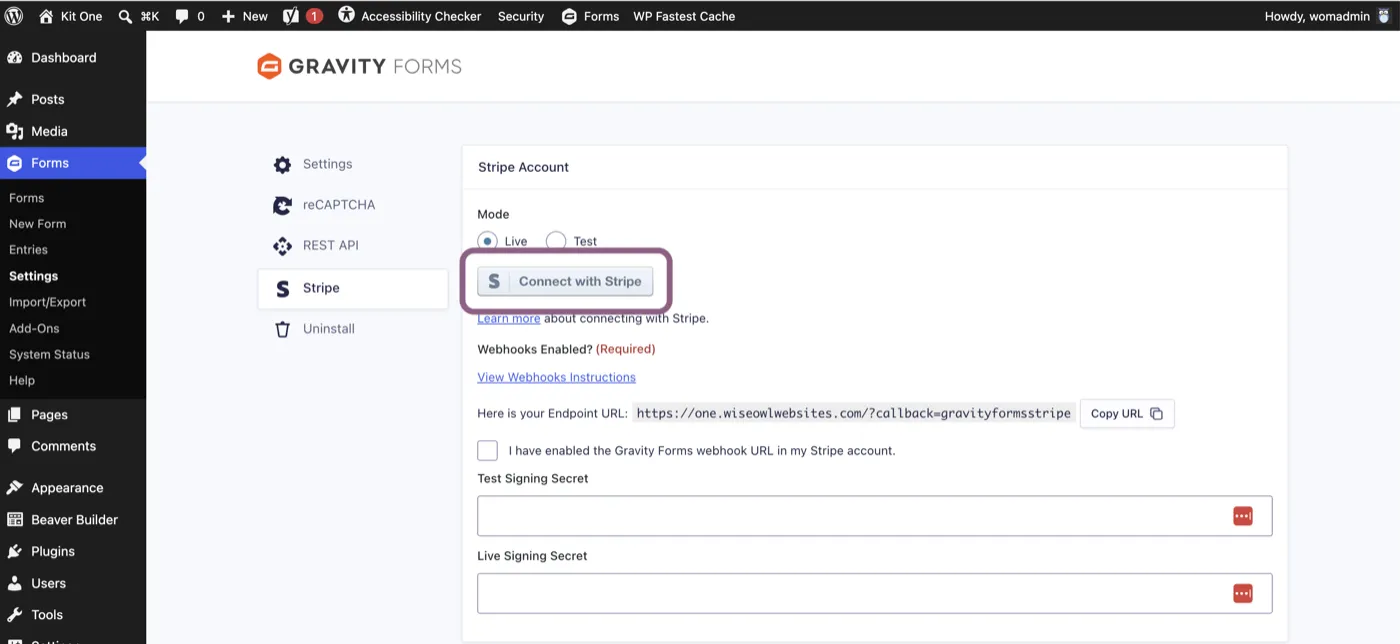
You'll see a Mode setting with Live and Test. I recommend just using live. Test mode allows you to make a purchase using a fake card number to test your form, but it means setting everything up twice. (Live and test are separate configurations with their own connection, their own webhook, and their own signing secret.) If you connect it live, you can always make a small purchase and refund yourself once you know it works.
Click the button that says, "Connect with Stripe." It'll send you over to Stripe to log in.
Select the account you want to connect, scroll down, and click Connect.
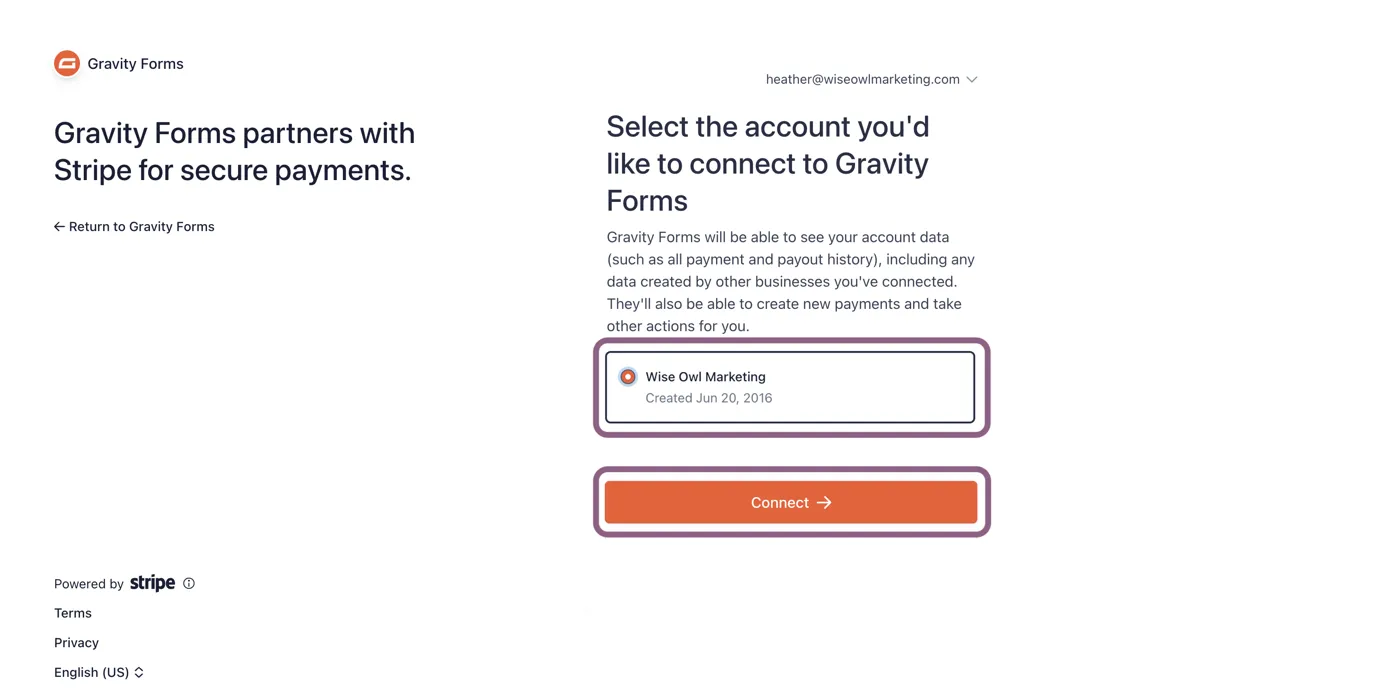
Stripe will send you back to your WordPress site and require you to log in again, which is normal. When you land back on the Stripe settings page, it should say "Connected to Stripe as" followed by your account name. (See screenshot below.)
Step 4: Create the webhook
A webhook is an address on your website that Stripe can communicate with. When somebody pays, Stripe needs to notify your site that the payment was successful, so the entry is marked as paid and your notifications work. Without that address, a payment can succeed in Stripe, and your website is never notified. The signing secret is how your site knows the message genuinely came from Stripe.
Start on the Gravity Forms settings page and copy the Endpoint URL to your clipboard.
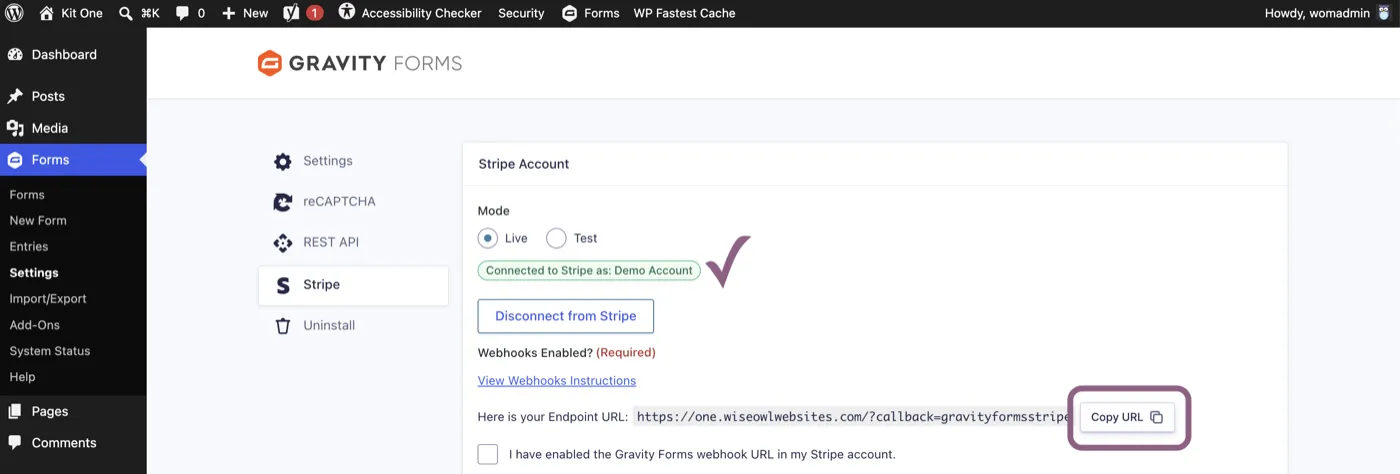
It looks like this, with your own domain in place of the example:
https://yourdomain.com/?callback=gravityformsstripeThen open your Stripe tab and type webhook into the search bar. Choose Create a webhook from the dropdown.

Leave it on Your account, and change the API version to the latest one.
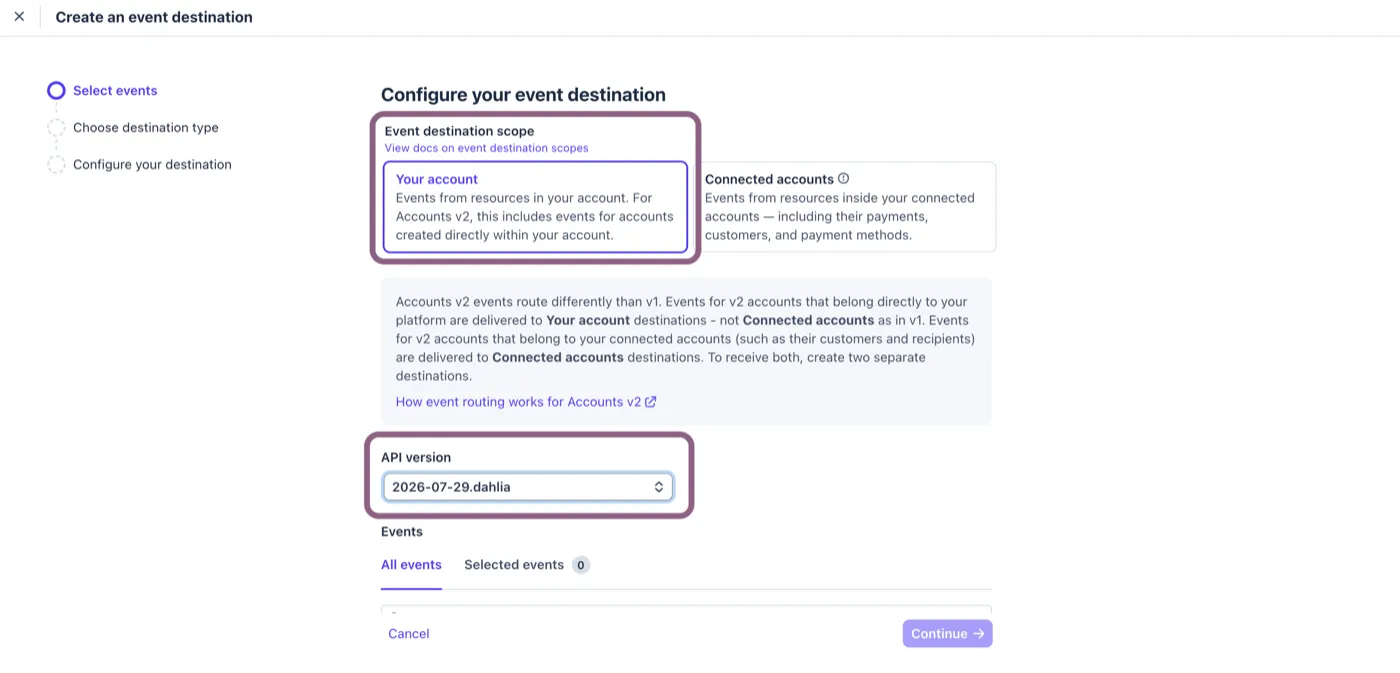
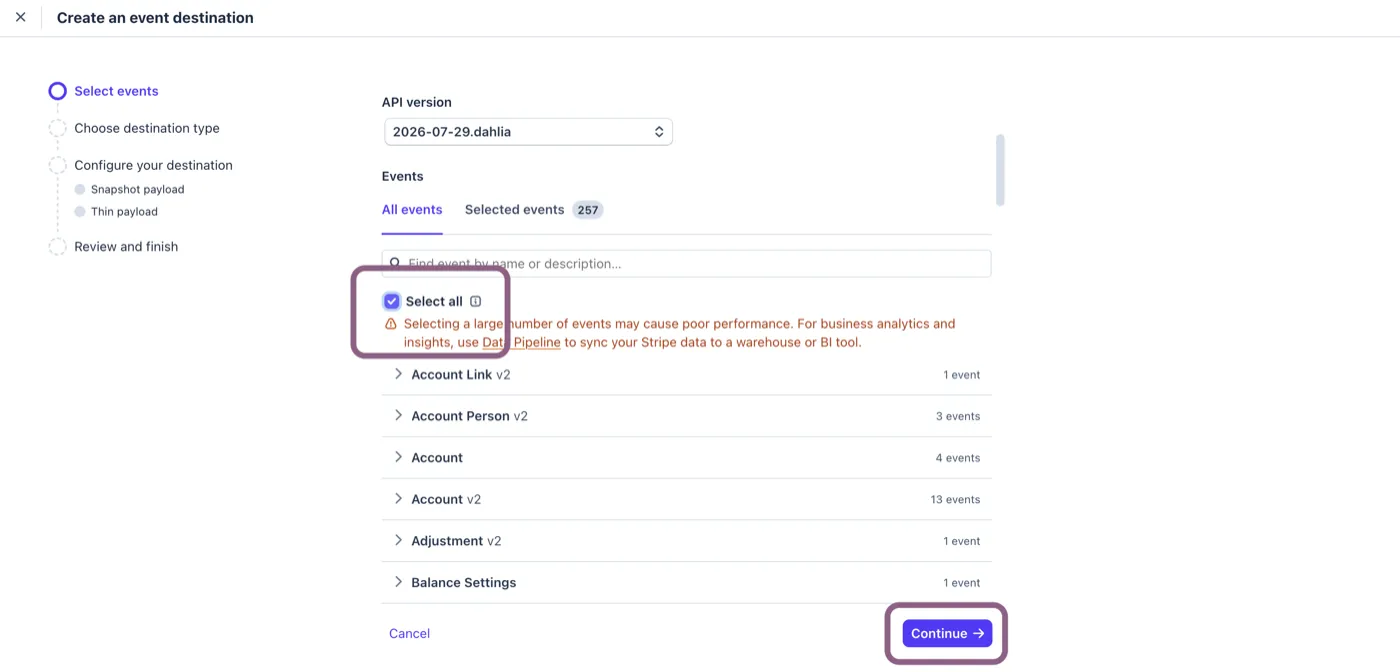
Gravity Forms says to select all the events and click continue.
Stripe will warn you that selecting everything may slow down transactions, but I've always followed the Gravity Form suggestion and done it anyway.
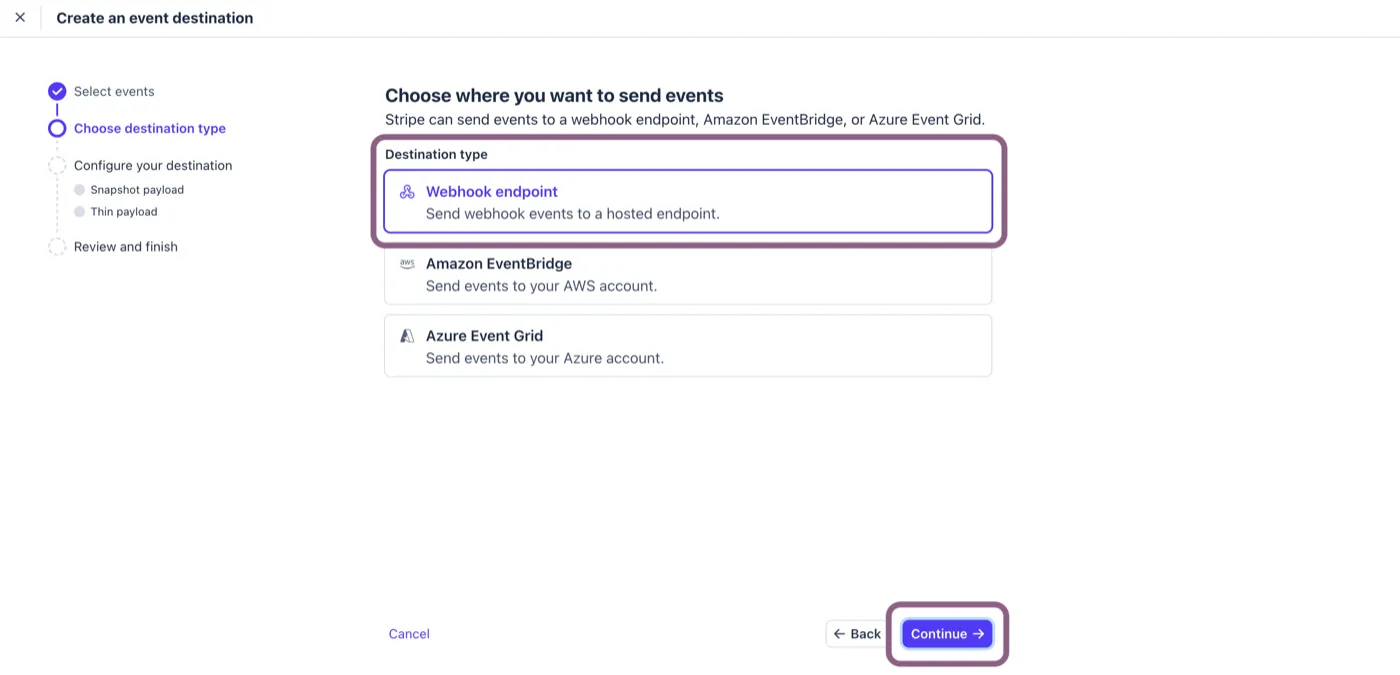
Leave the destination type on Webhook endpoint and continue.
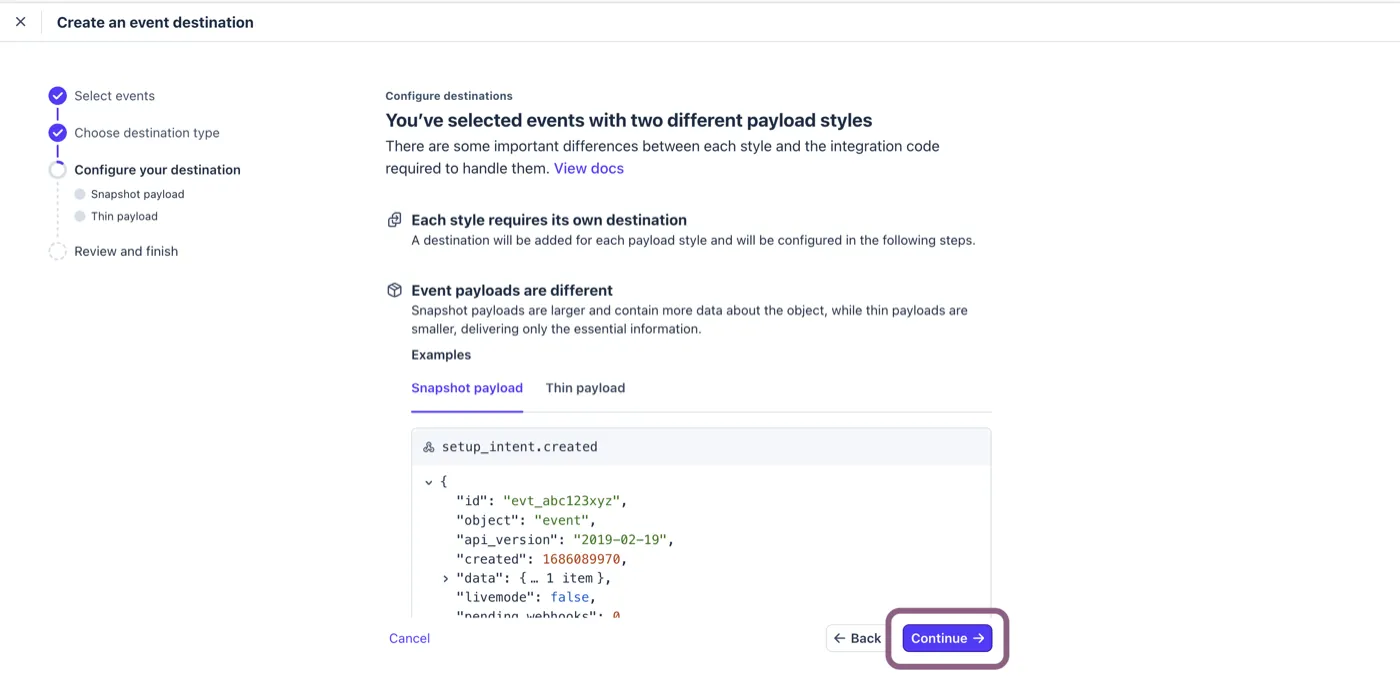
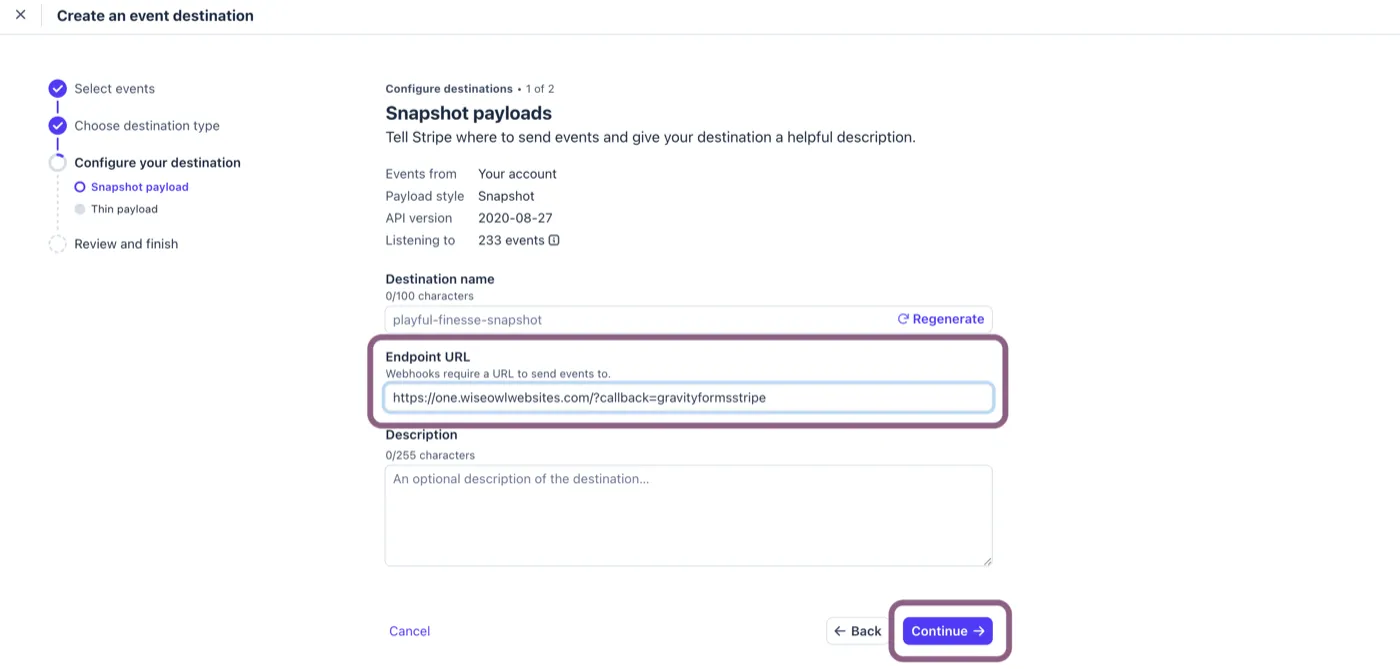
On the Configure Your Destination page, Stripe explains that your selected events come in two payload styles, snapshot and thin. You don't need to worry about the details here. Just click continue and keep going.
Slow down and pay attention here. This step is important.
On the Snapshot payloads page, paste the endpoint into the Endpoint URL field, and then click continue.
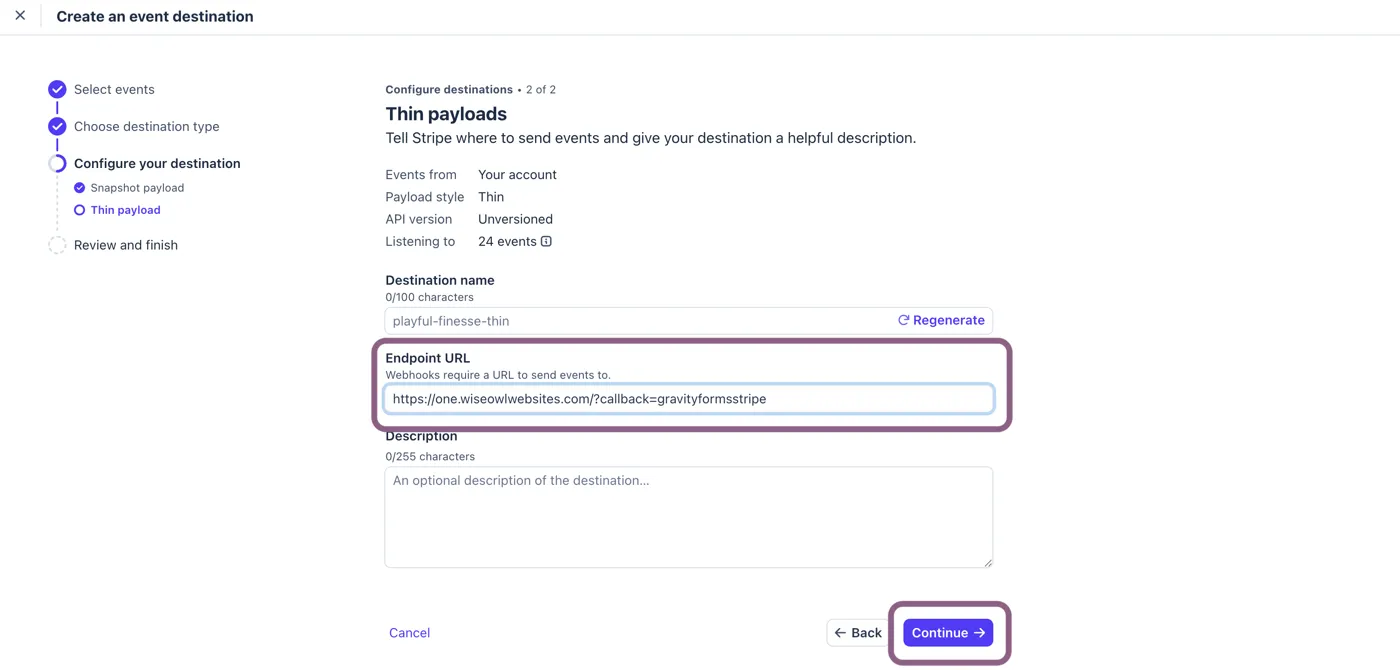
Repeat the process for the Thin payloads page. Use the same URL both times.
Then click continue.
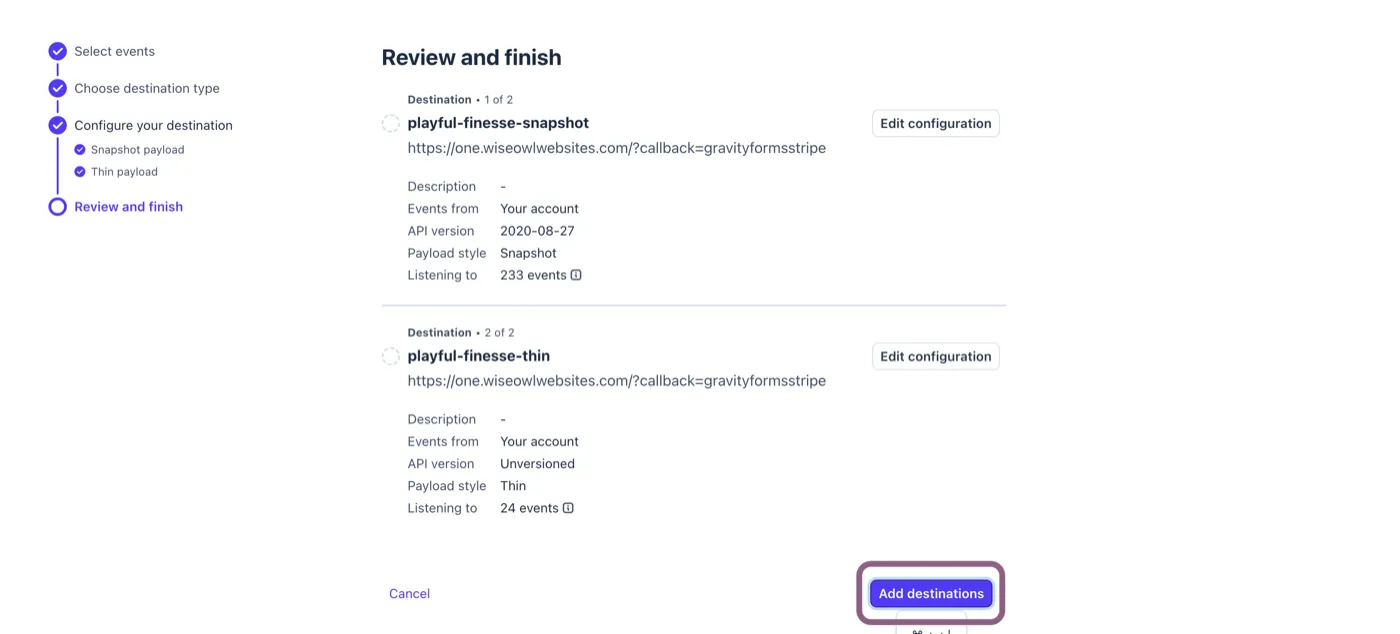
On the Review and finish, click Add destinations.
Slow down here again. Once the payload destination settings are configured, Stripe will show you the signing secret. Copy the top one to your clipboard. It starts with whsec_.
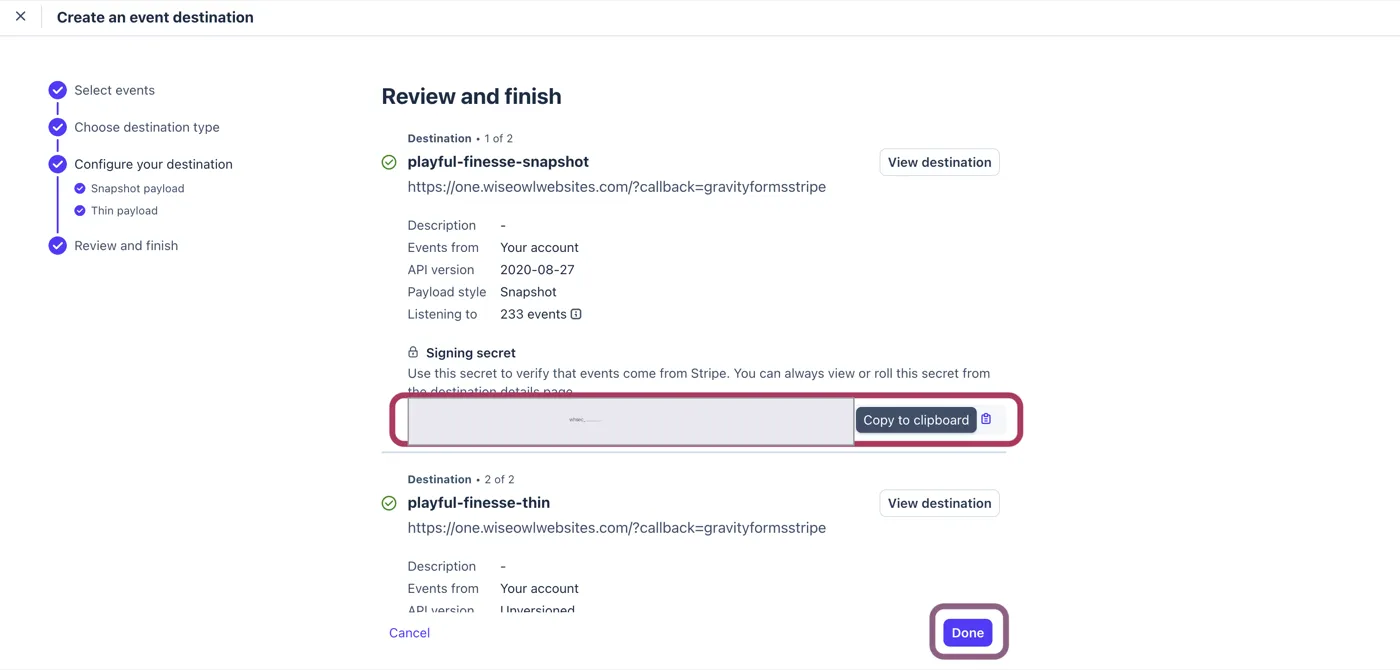
Then, come back to Gravity Forms and paste it into the field that matches the mode you're in, Live Signing Secret or Test Signing Secret.
Then tick the box that says I have enabled the Gravity Forms webhook URL in my Stripe account, which is easy to forget.
Select Stripe Fields (Elements, SCA-Ready) if it isn't already selected, and click Save Settings.
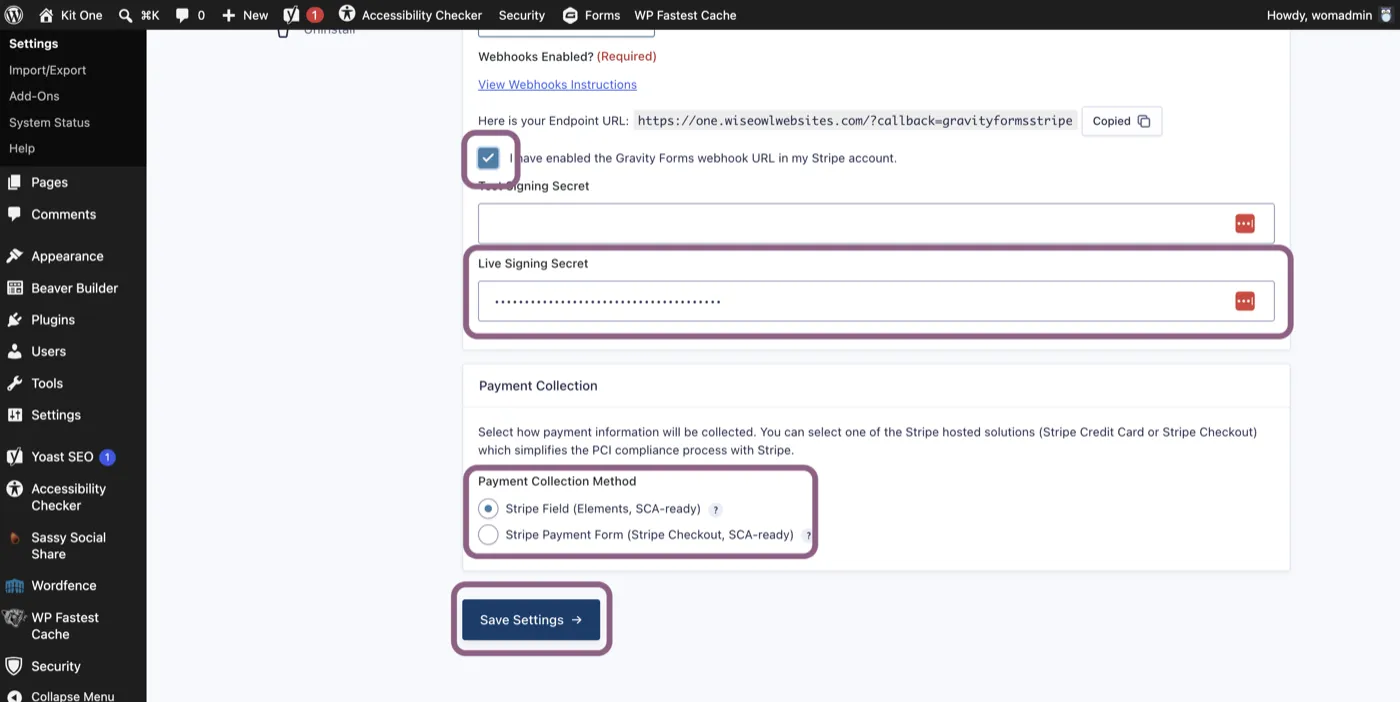
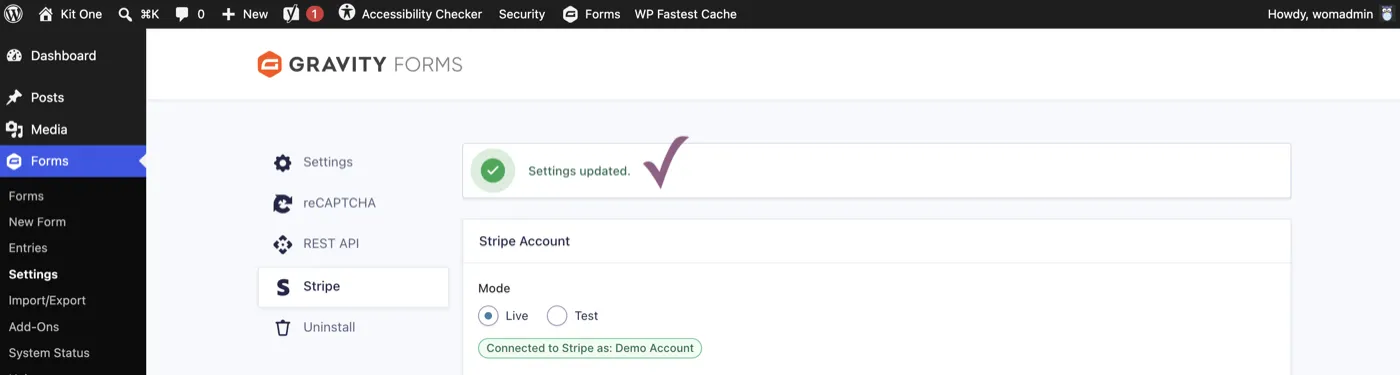
Treat that signing secret like a password. Paste it straight from Stripe into WordPress. Don't email it to your developer, and don't put it in a support ticket.
Step 5: Create the feed
This is an easy step to forget.
The feed is what actually tells Stripe to collect the payment. Connecting your account doesn't do it. The Stripe field on the form doesn't do it. Without a feed, nothing is sent to Stripe.
Go back to your form and refresh the page. Then, scroll back down to the credit card field and click on create a Stripe feed.
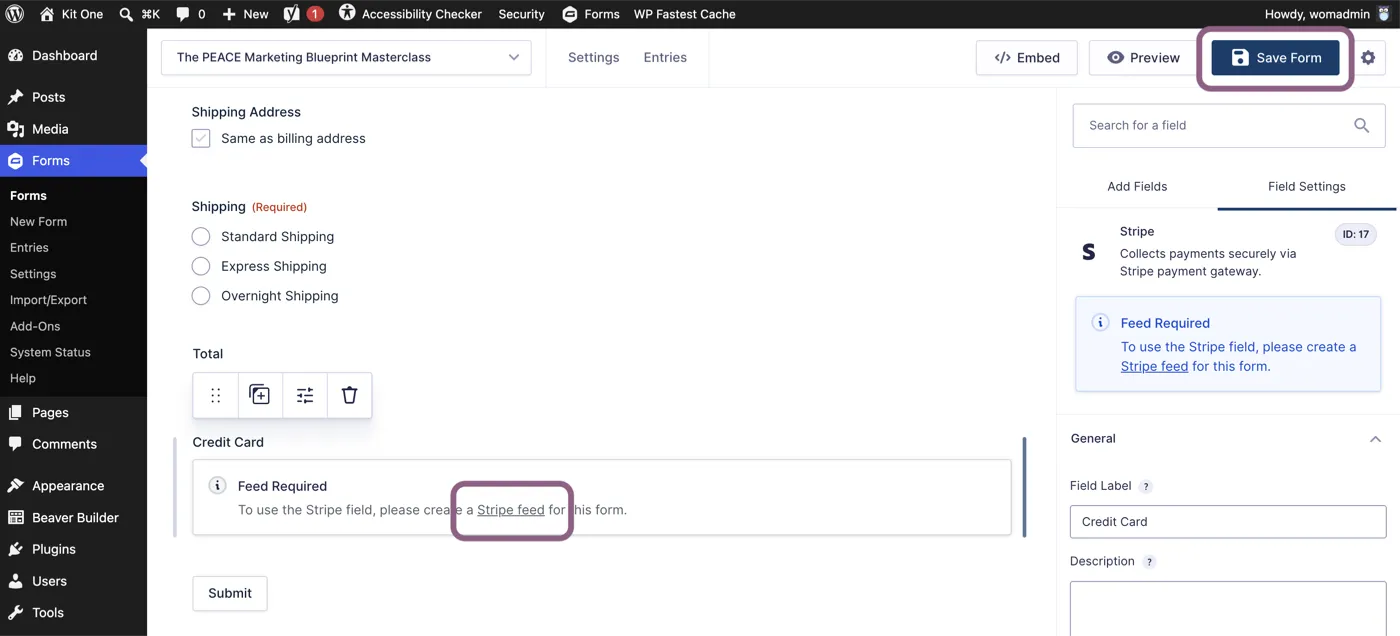
Click through and choose Add New.
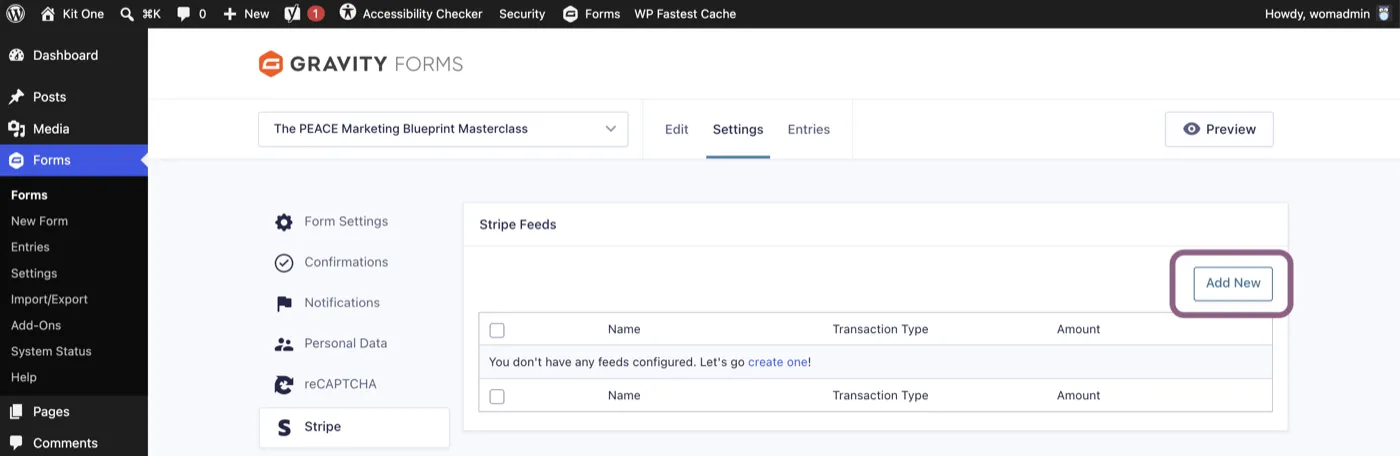
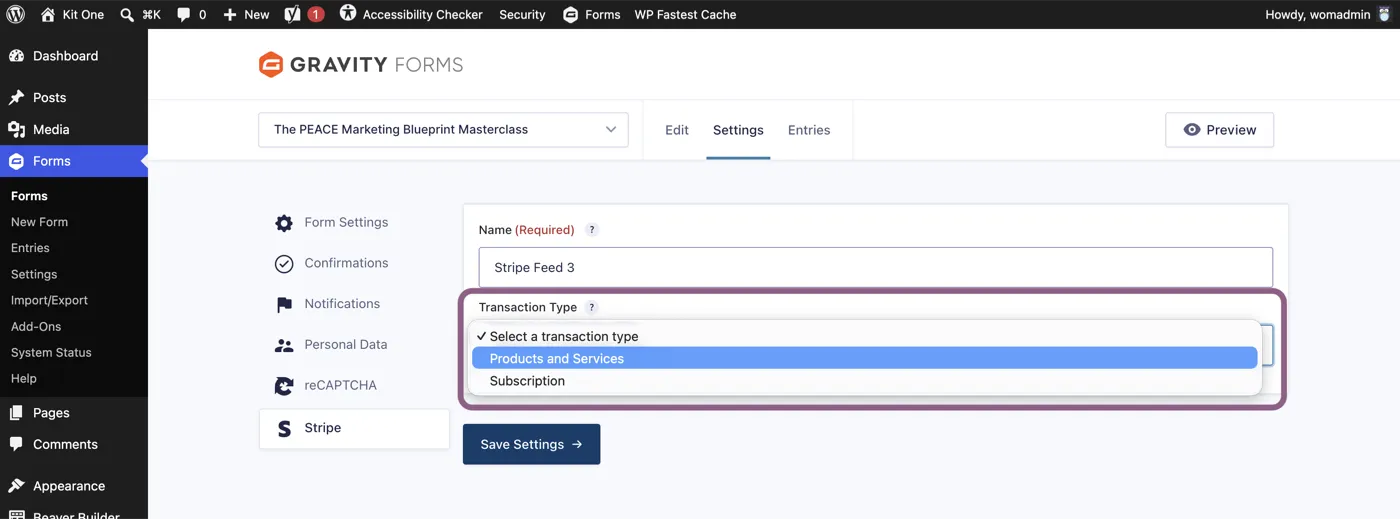
Give the feed a name, then pick your transaction type.
Products and Services is for a one-off payment, where somebody is paying you once for this one thing.
Subscription is for recurring billing, like a retainer or a membership.
The payment amount will default to your form total, which is what you want.
Below that, you line up the billing address fields. Work down the dropdowns and match each one to the matching field on your form: address, address line 2, city, state, zip, country.
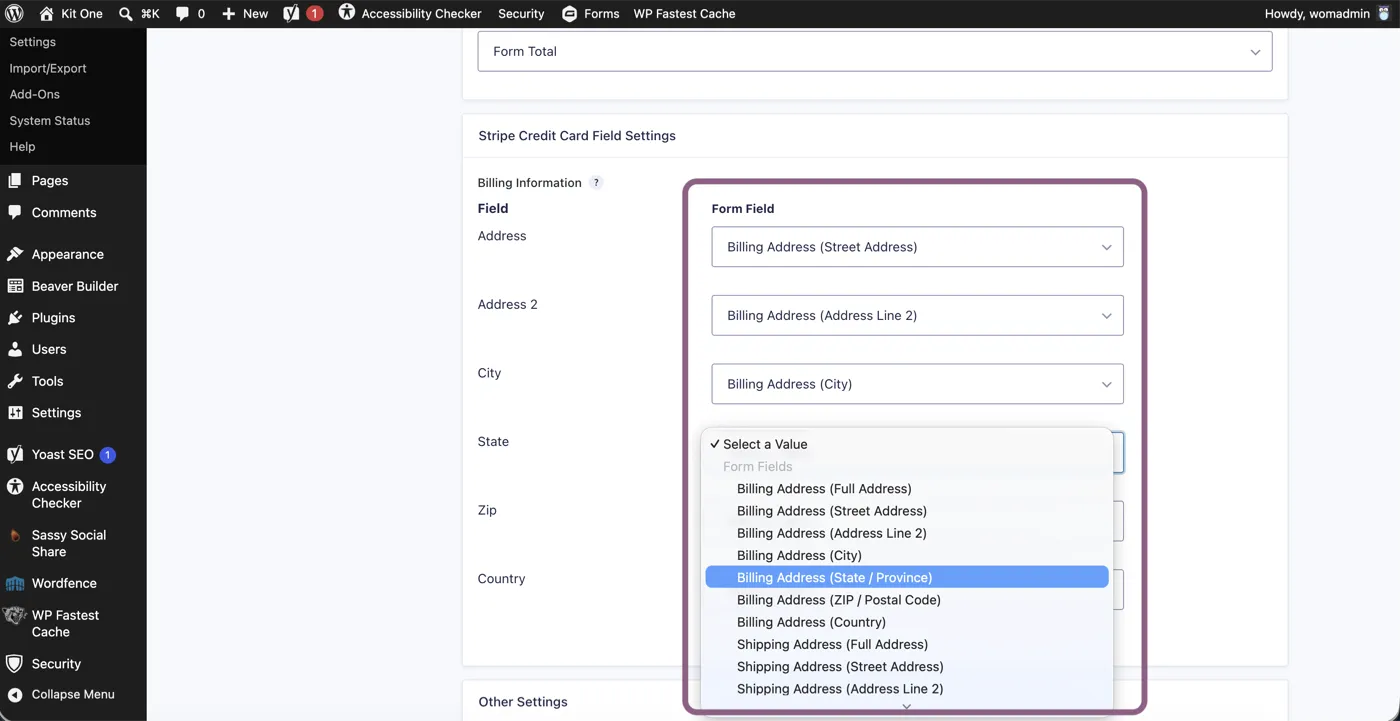
Email is usually already selected. Set the name field to their full name while you're there.
The rest is optional:
Metadata sends custom information over to Stripe, like the product name, so payments are easier to identify later.
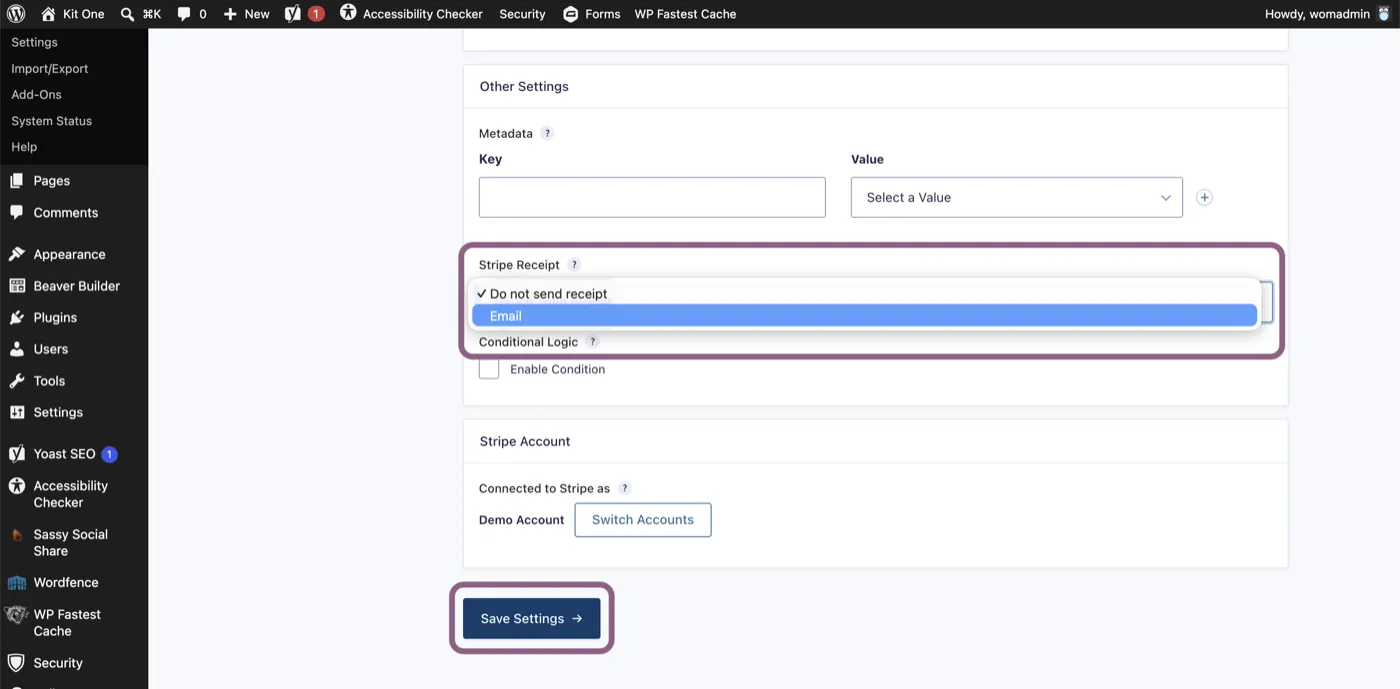
Stripe receipt sends the buyer an email receipt from Stripe. I turn this on.
Conditional logic is there if you only want the feed to run in certain cases. You can set up different feeds for different products this way.
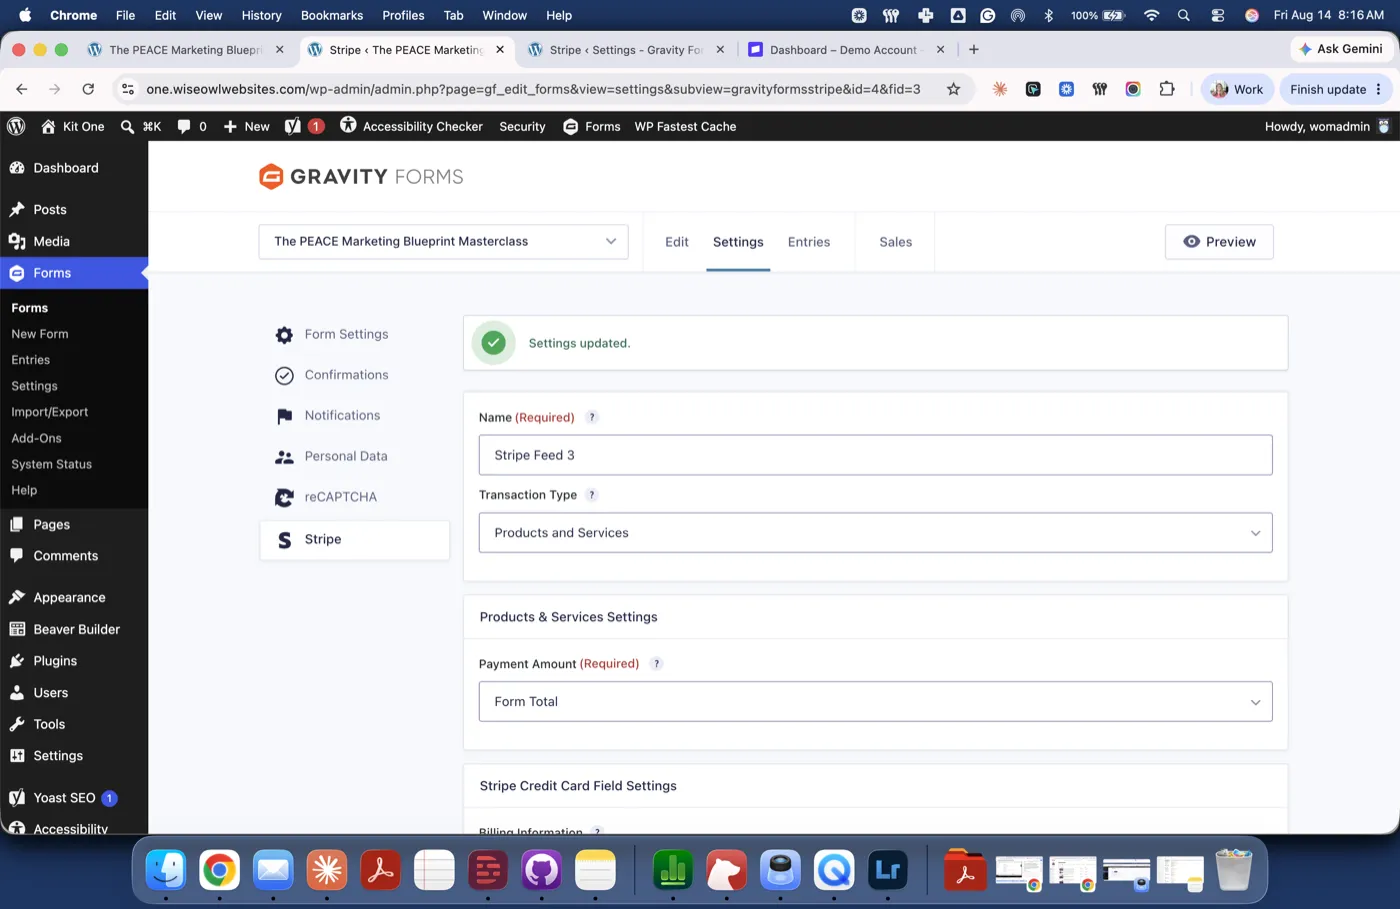
Check that the Stripe account shown at the bottom is the one you actually want to be paid into, then click Save Settings.
Step 6: Put the form on your site
Go back to the form and refresh it one more time. Now you should see the actual credit card fields sitting there.
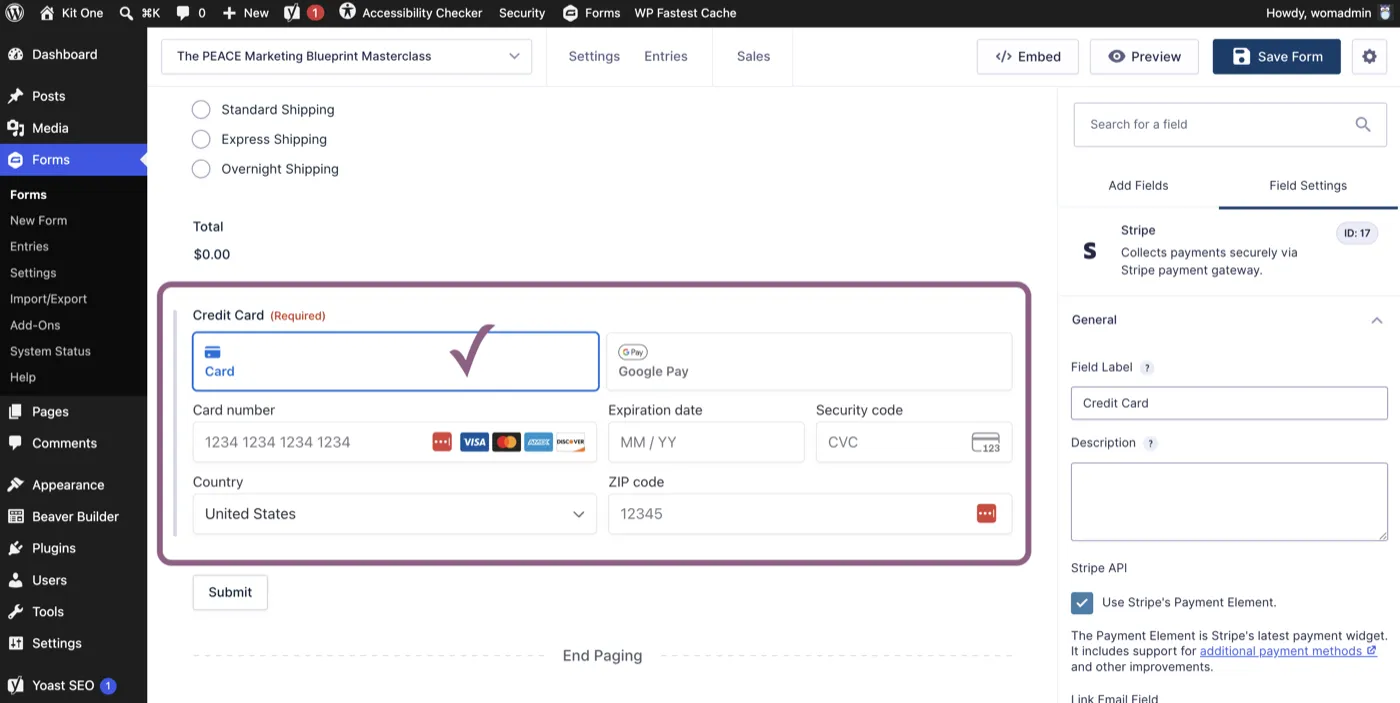
To get it onto your site, click Embed at the top. From there, you can drop it into an existing page, such as your checkout page, or create a new page right from that panel.
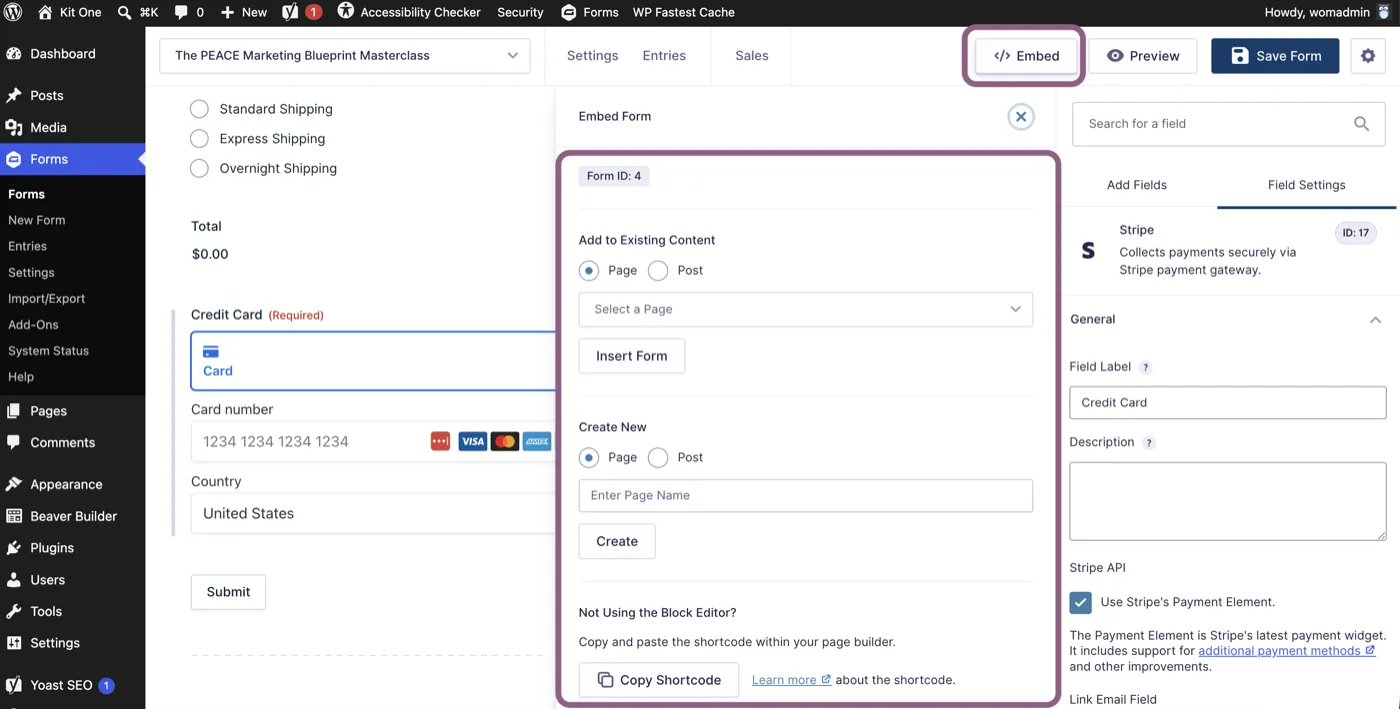
If you build with a page builder like Beaver Builder or Elementor, you can copy the shortcode instead and paste it into a text element. Most builders also have a Gravity Forms element you can pull in and point at the form, which is usually the nicer option because you can style it from there.
Test before you go live
Preview the form and fill it in properly, address and all, then pay with a real card for the smallest amount the form allows. You can refund yourself afterwards.
Then check three places, not one:
The entry in Gravity Forms shows as paid.
The charge appears in your Stripe account.
The webhook shows a successful delivery in Stripe's event logs.
That third one tells you that step 4 actually worked. A charge landing in Stripe only proves Stripe took the money. The webhook is what tells your website about it.
If payments aren't coming through
Work down this list in order:
No feed on the form. Nothing reaches Stripe. Check step 5 first, every time.
The Stripe field was deleted at some point, which switched off the feeds automatically.
The signing secret is in the wrong box, a test secret in the live field or the other way round.
The webhook is failing. Stripe logs every delivery attempt and the response it got, and that log usually names the problem outright.
Only one destination was added. Remember the endpoint URL gets added into Stripe twice, once for snapshot and once for thin.
One note on what you collect
Whatever you put on a payment form travels further than you might expect. Field labels, dropdown choices, and anything you map into Stripe metadata all reach Stripe and sit in your form entries.
For most businesses, that's not a big deal. If you work in health, therapy, law, or anywhere the reason someone is paying you is sensitive, keep that detail off the payment form. A deposit is a deposit. It doesn't need to say what it's for.
Once payments are working, the next thing worth setting up is the step clients take before giving you a payment, so people can book you without the back and forth. That's covered in the guide to appointment scheduling for coaches. Both of these are part of the Automate Simply pillar in the PEACE Marketing Blueprint. That's my 5-part framework to help you build a marketing emergency fund and create a business that doesn't require you to always be "on."
Frequently asked questions
Do I really need a webhook for Stripe and Gravity Forms?
Yes. Gravity Forms* requires webhooks to be enabled in your live environment, and in test if you use it. The webhook is how Stripe tells your website what happened to a payment. Without it, somebody can pay you successfully and your form entry will never be marked as paid.
Does connecting with Stripe set the webhook up for me?
No. The Connect with Stripe button links your Stripe account to Gravity Forms and stops there. It doesn't create the webhook endpoint, and it doesn't fill in the signing secret. You create the webhook in your Stripe dashboard yourself and paste the secret back into Gravity Forms by hand. This catches a lot of people, because the connection screen looks like it finished the job.
What is a signing secret and where do I find it?
The signing secret is a code that proves a message really came from Stripe. Stripe shows it to you once you've finished creating the webhook destinations, and it starts with whsec_. You paste it into the Live Signing Secret or Test Signing Secret field in Gravity Forms, depending on which mode you're setting up. Treat it like a password.
Why do I have to paste the endpoint URL twice?
Stripe splits your selected events into two payload styles, snapshot and thin, and each style needs its own destination. You use the same Gravity Forms endpoint URL for both. If you only create one, part of your setup is missing.
Why is nothing reaching Stripe when my setup looks complete?
The most likely reason is a missing feed. Connecting your Stripe account and adding a Stripe field to the form aren't enough on their own. The feed is what tells Stripe to take the payment, and without one nothing is sent at all, with no error message anywhere.
Do I have to set everything up twice for test and live?
Only if you use test mode. Setting up live on its own is a complete setup, and it's what I'd recommend. If you do rehearse in test mode first then yes, you do the webhook step again for live, because test and live are separate configurations with their own connection, endpoint and signing secret.
Do I need an e-commerce platform to sell from my website?
Not for a coaching package, a masterclass or a low ticket offer. If you already have WordPress and Gravity Forms*, a form with a Stripe feed lets people pay you on your own site without adding a shop platform on top. You could also use a Stripe payment link, but that sends people off your website to pay.
Whenever you're ready, here's how I can help
Start free and go at your own pace. No pressure, ever.
- Free: Keep reading the blog and subscribe on YouTube. I share everything I know.
- DIY: Get the PeacefulBiz app to organize, plan, create, and simplify your marketing.
- Guided: Join the Peaceful Marketing Lab, and let's build together.
- Direct: Book a strategy call for 1:1 help, a custom website, or to decide which program is right for you.
Want the whole framework?
The PEACE Blueprint Guide walks you through all five pillars, with planner pages to build your own peaceful marketing system.
Get the free guide

Heather C. Stephens
25+ years in marketing and 11 helping coaches and service providers get found online without burning out. Founder of Wise Owl Marketing and creator of PeacefulBiz and the PEACE Blueprint.
More about Heather →


Get peaceful marketing ideas delivered to your inbox each week.
One practical idea at a time, written like a note from a friend who happens to know marketing. Read it and try it that afternoon.