
Your Lead Magnet is a great way to attract new clients and grow your business, but you have to learn how to get it in the hands of your potential leads. That’s where this post comes in – today I’m going to show you how to deliver your lead magnet and how to promote it to your audience.
If you don’t have an amazing lead magnet yet, can check out Lead Magnet ideas with my post about 10 of the Best Lead Magnet Ideas for Coaches, Consultants & Entrepreneurs.
Okay, let’s get to it!
Lead Magnet Delivery 101:
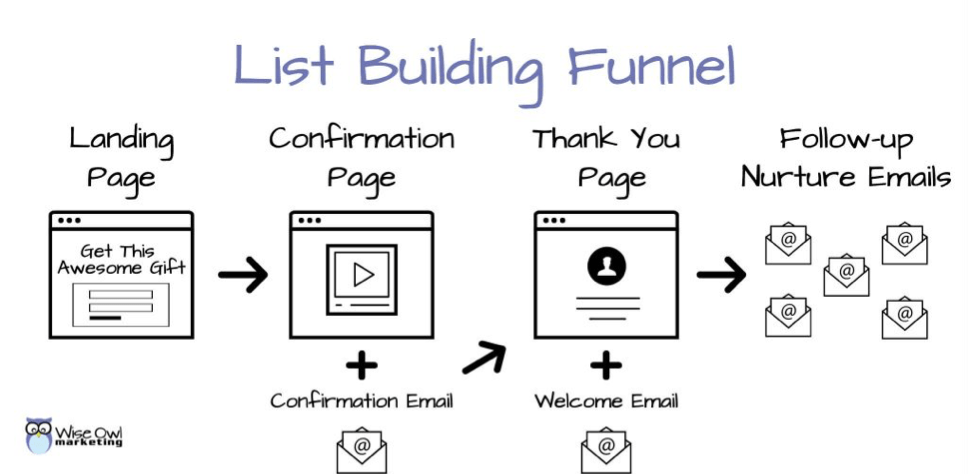
The lead magnet delivery graphic below is a pretty simple recipe to follow that will allow you to collect emails and leads. Here is a diagram of how the flow of your list-building funnel will go.
- The landing page is where people will opt-in to get your lead magnet.
- The confirmation page is where you’ll ask them to go click the link in their email to confirm their address.
- Your lead magnet delivery will happen on the Thank You Page and in the Welcome Email.
- And your follow-up nurture emails will build rapport with your new lead and guide them towards the next step in working with you, such as your discovery call.
Step 1: Starting With the Landing Page or Lead Magnet Opt-in Page
This is the page where you will “sell” your lead magnet to the visitor.
Your landing page is a dedicated page on your website to promote your lead magnet. It should contain an opt-in form, compelling copy to pique your visitors’ interest, and often an image or mock-up of the lead magnet.
Ideally, your landing opt-in page should be set up like a squeeze page without anything to distract your visitor from opting in. Website elements like your navigation menu, sidebar, links to your social channels, etc. should be removed from this page to help your visitors focus. Ultimately, the best landing pages give website visitors two options: opt-in or click away.
Instead of sending people to your homepage, drive traffic to this page by linking to it from your other blog posts, social media bios, link tree, email subject line, etc.
Example of a Lead Magnet Landing Page:

Click the button below to see this actual landing page. And while you’re there opt-in to get 101 lead magnet examples you can use in your business!
Step 2: The Next Steps in Your Lead Magnet Funnel are the Confirmation Email & Confirmation Page
Confirmation Email:
At the same time as they are taken from the landing page to the confirmation page, your email marketing provider (Example: MailChimp, Active Campaign, Etc.) will send your new subscriber an email to the address they have provided with a link to click to confirm the address. This is an email with a link or a button the new subscriber can click to verify their address. Email services call this a double opt-in. It’s encouraged, but not required by all email marketing platforms.
Using a double opt-in is a good idea because the leads you have are likely to be better quality. You’ll have fewer bounced emails and your email open rate will usually be higher. This confirmation will help you to ensure you have a list of subscribers who want to receive your content.
Confirmation Page
Once someone enters their name and email to get your lead magnet you have a choice to show them a confirmation message that or to take them to a confirmation page.
Instead of sending your new subscribers to a generic confirmation page provided by your email service or giving them a basic message on the landing page, create a new page on your site to be your Confirmation page.
I like to take them to a different page so I can exceed expectations by providing a video or something extra on that confirmation page to help my new subscriber.
Remember to include a message that tells them you have sent them an email with a link to confirm they entered the correct address. Let them know when they click the link they will be taken to their free gift.
I also like that I can track my opt-in conversion rate more easily by looking at the # of visitors my confirmation page received divided by the # of visitors my landing page received. This percentage rate tells me how my landing page is performing and gives me an opportunity to tweak things, like my headline, graphics, copy, etc. to increase the conversion rate so I’m getting more people who see the page to opt in.
If you opt-in for my lead magnet ideas landing page by clicking the button above you’ll get to see my confirmation page. 😉
Step 3: Your Welcome Email and Lead Magnet Thank You Page
The Thank You / Download Page:
Your “thank you” page is a hidden page on your site that contains the download link of the lead magnet. Set the page to be hidden from the search engines as well as your website search. You don’t want people to get your lead magnet if they haven’t subscribed.
Instead of adding the link to the lead magnet directly from the email, my preferred way to deliver the lead magnet PDF is to link to a Thank You/Download page from my welcome email. I’ll write a “thanks for subscribing” message, remind them to whitelist my email, and give them a link to download the Lead Magnet PDF on that thank you page.
I also like to use this page to promote another offer or add an additional call to action, like “Join my Facebook Group” or “Schedule a Discovery Call.”
Your Welcome Email:
Be sure to create a welcome email that gets sent out automatically when someone confirms their subscription. (This email is sent out when they click the confirmation at the same time they are taken to the thank you page.) The email should include a link to your thank you page with a link to your free gift as well as a message from you.
This email is likely to be the email that gets the highest open rate because your subscribers are excited to get their free gift. Use this as an opportunity to develop rapport with them and set expectations for what’s to come. Build anticipation about your follow-up emails and why they should be sure to open them!
Where to Host Lead Magnet
You have a bunch of options for where to host your lead magnet. The two I recommend most often to clients are Google Drive or uploading it to their Email Marketing Platform if that’s an option. Of the two choices, Google Drive is my favorite. Below I’ve included click-by-click instructions to show you how to host your lead magnet on Google Drive and MailChimp.
How to Share a Link to Your Lead Magnet PDF from Google Drive
I use this method to host my lead magnet files and I add these links to my Thank You Page. However, if you prefer to include a link to your lead magnet in the welcome email when you’re using an email platform like ActiveCampaign you can do that, too. I also like that I can keep all my lead magnets and content organized in one place.
1. Go to Google Drive
2. Click on New

3. Upload your Lead Magnet PDF

4. Once it’s done uploading, click on your Lead Magnet PDF to open the file

5. Click on the vertical three dots “More” actions in the top-right corner

6. Click on Share

7. Click on the General Access drop down menu

8. Select on Anyone with the link

9. Then click the “copy link” button to copy the link to your clipboard

10. Click on Done

How to Deliver Your Lead Magnet with MailChimp
If you prefer to deliver the lead magnet file directly in your email, you can send someone the link to your Lead Magnet PDF without having to add an attachment. MailChimp will host the file in your “content studio” for you.
1. Go to Mailchimp Dashboard
2. Click on Content Studio

3. Click on My Files

4. Select your Lead Magnet PDF file from file upload menu

5. Copy URL to the Lead Magnet PDF to add a link to your welcome email

Step 4: Follow-Up Nurture Emails:
Now that you’ve worked hard to get a lead (Congratulations!) it’s essential that you stay in touch with them to develop know, like, and trust.
Write a series of automated emails to help to position yourself as a trusted authority, build trust, and to keep inviting your readers to schedule an appointment or buy your product. If you create these as an autoresponder in your email service you’ll be able to set it and forget it! 🙂
Keep in mind that email service providers call these pages by different names. You might want to read the documentation provided by your email service provider.
Additional Lead Magnet Delivery Tips:
- Make sure your Thank You page is hidden from the search engines and the search function on your site so people can’t get to your free gift without subscribing.
- Simple landing opt in pages with great copy usually convert better than pages with lots of bells and whistles.
- Test your opt-in sequence to make sure everything is working properly before sending traffic to your page.
- Make sure that the actual lead magnet you are delivering is coherent with the rest of your business.
- Make it pretty and brand the opt-in offer with your colors and fonts.
29 Ways to Promote Your Lead Magnet:
There are many ways you can get your opt-in offer out to the world. Here are some ideas to get you started…
Use your website to promote your lead magnet:
- On your home page
- In an exit popup (this works from a conversion standpoint but may reduce your SEO benefit)
- Sidebar of your blog
- At the bottom of your blog articles. Try to make the transition from the article to the lead magnet smooth.
- Footer
- About page
- Resources page
- Throughout your content, whenever relevant, link to your landing page
- Blog content write about things related to your lead magnet and promote it in the post
- Your author bio
Promote your lead magnet on your social channels:
- In social posts
- Pin it to the top of your Facebook feed.
- Instead of linking to your home page, link to your landing page in your social profiles
- Add a tab to your Facebook page for your lead magnet
- Offer it as a freebie to your Facebook group members
- Add your lead magnet to the Media Section on your Linked In Profile
- Paid ads on your social channels
- Create a video on YouTube to promote your lead magnet and link to your landing page in the description
- Share it in Facebook and Linked In groups that allow self-promotion (Engage with the group and provide value before promoting yourself. Be sure to follow the group’s rules. It may be only allowed in certain threads on certain days.)
- Update your cover photos to include your lead magnet image and call to action
Other places to promote your lead magnet:
- Your email signature
- Business cards
- Guest blog posts and/or your author bio on guest blogs
- When you are being interviewed on a podcast, mention it in passing and let people know where to go get it.
- Your signature in forums (if allowed)
- Offer it as a gift to your audience during speaking engagements
- Your professional network
- Business organizations & networking groups
- Ask other people in complementary but not competitive niches if they’d like to offer it as a free bonus to their audience. Reciprocate and share their offer with your audience. (Examples of complementary niches: wedding florist, photographer, dj, wedding planners, decorators, etc.)
There are tons and tons of ways you can promote your lead magnet, the above are just samples! Use your imagination and be creative.
If you need help with Lead Magnets or the Delivering and Promoting of them join the Automagic Business Academy! I’d love to help you master your marketing and reach your goals!
🙂
Heather


")

Looking for Something Specific?

Where Should I Send Your Free 2026 Marketing Planning Bundle?
*Your free planner will be delivered to your inbox. Check your spam folder if you don't see it within 15 minutes. Submit a support ticket if you need help. By entering your email address, you agree to receive emails, including marketing tips, offers, and announcements, in accordance with my privacy policy.
